
This post is about deploying a Django application on Linux shared hosting using Cpanel. This article was originally published in 2019. At that time, it was possible to only use Django 2.1. But things have changed on the way and it is being updated with time. I am writing this update in May 2022 and currently, it is possible to use the latest Django 4.0.4 on shared hosting. In this post, I will be guiding you step by step in the process of deploying a new or an existing Django app on shared hosting.
Why Shared Hosting?
When it comes to deploying Django applications, you have many options available. Deploying on shared hosting might not be the best option overall but it surely has some advantages. The most prominent advantage is cost. Popular options like pythonanywhere or heroku 5$ to 7$ a month on the basic plan which could limit the RAM usage at 512MB and disk usage at 1GB. However, you can get a shared hosting which gives you 1 GB RAM and 20GB SSD for as less as 1.88$ a month. In addition to this, if you already have a website on shared hosting, you do not need to spend anything at all.
Check if your hosting is compatible
To follow this tutorial, your shared hosting must have the following features:
- Linux Hosting
- Access to CPanel
- Support for python apps
- Command-Line access to the server
Most of the shared hostings are Linux hostings. You can check your hosting specifications from whichever hosting company you bought it.
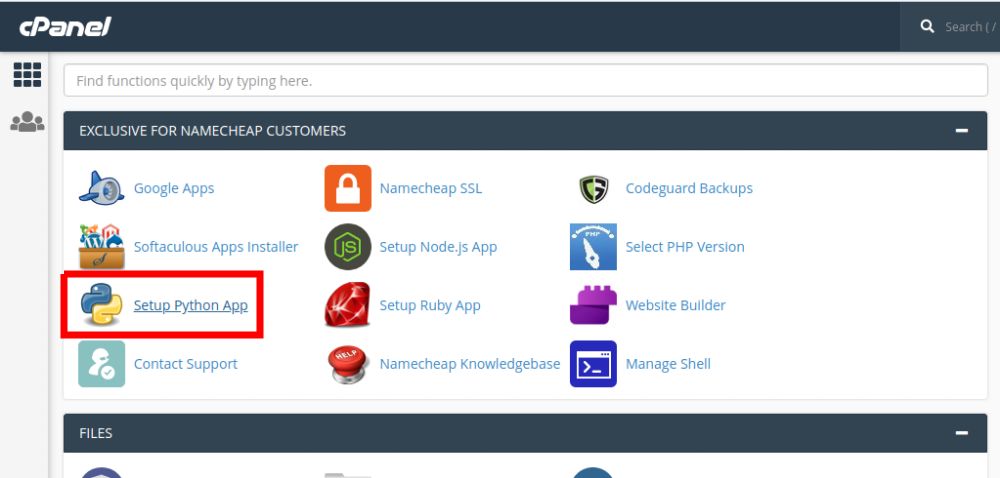
To check if your hosting supports python, log in to your CPanel and look for the option “Setup Python App” marked in the following screenshot. If you can find it, you are good to go.
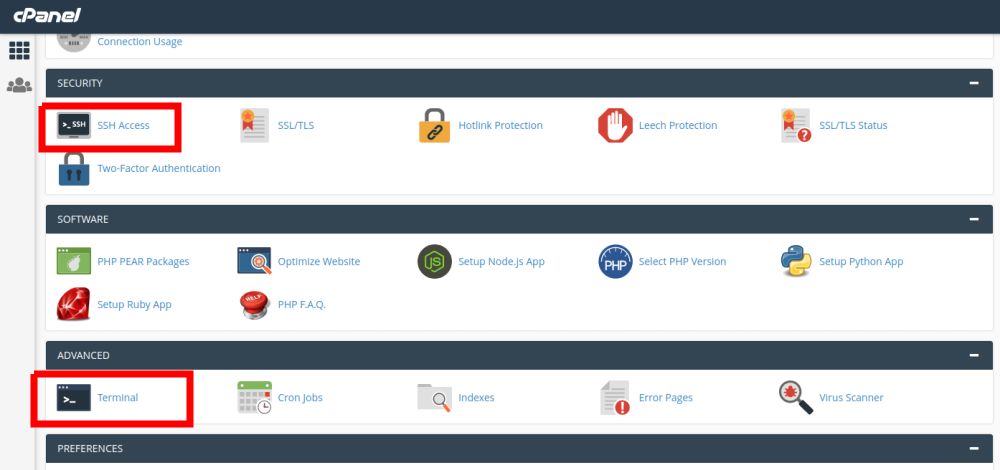
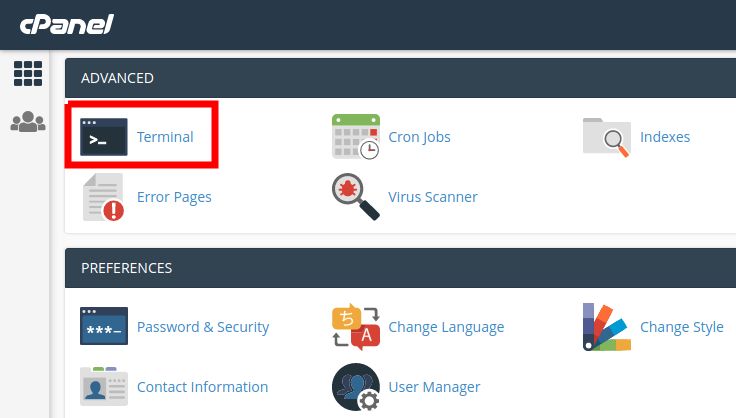
To check if you have command line access to your server. Try to find “SSH Access” or “Terminal” options in your Cpanel.
If you are having any confusion in checking your hosting for compatibility, you can contact your hosting support. Good hosting providers have good support always ready to assist you on any issue.
If your hosting is compatible, then great!. You can follow this tutorial.
If your hosting is not compatible or you don’t have a hosting yet, you will have to purchase shared hosting. Make sure to check the four features in the above list when buying a shared hosting for Django. It is always better to contact the customer support of the hosting and ask them the questions. In this way, you will also test how good their support is. Remember! “A good hosting has a good support”. The best way to contact is via live chat.
Let me mention here the shared hosting that I am using. I am using the NameCheap shared hosting, the stellar plus plan. Previously, I used the stellar plan of their shared hosting. I can recommend this hosting because I am satisfied with its services. If you buy the stellar plan, you can use Django version 4.0.4 and host three websites with unlimited bandwidth. If you buy the stellar plus plan, you can use the Django version 4.0.4 and host unlimited websites.
If you plan to buy shared hosting for deploying Django, consider using my affiliate link. It will not increase the price for you but I will get a commission from whatever you buy in your first order. If you are going to buy a domain too along with hosting, you can use this link to get a special discount on the domain.
Deploy a Django App
Get Command-Line Access
You can get command-line access to your hosting server in two ways: using SSH or via an online terminal. If you want to work via SSH, read your hosting provider’s documentation on how to do that. I will be using the online terminal because it is less complicated to use.
In your CPanel, open the Manage Shell option.

Turn on Enable SSH access
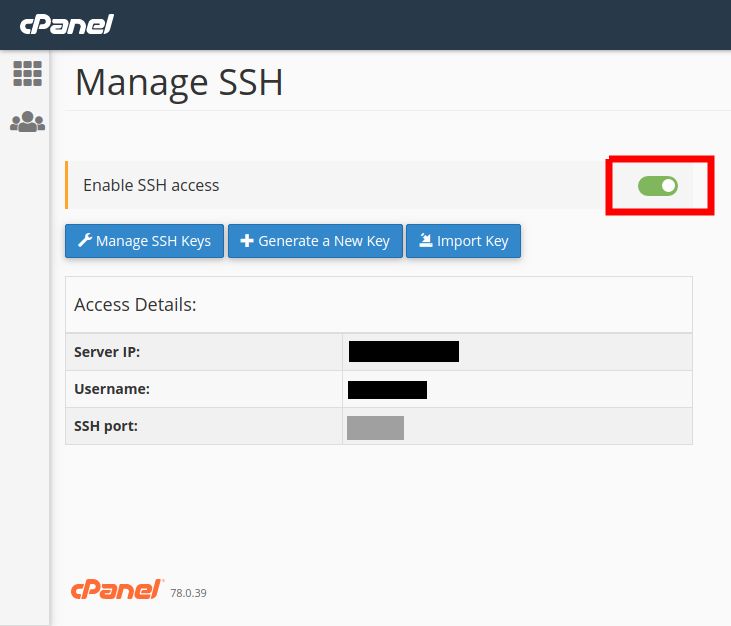
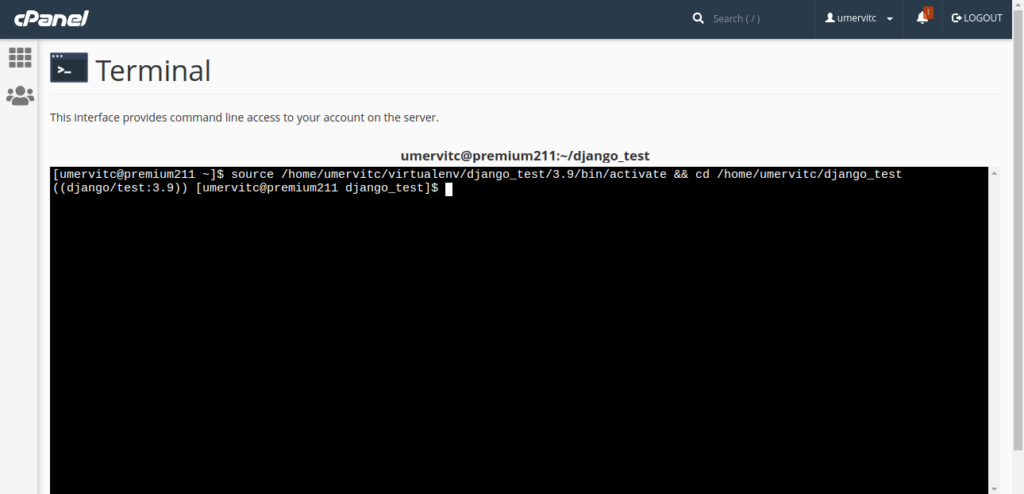
Now you will see the Terminal option in CPanel. Open it to check if it is working.
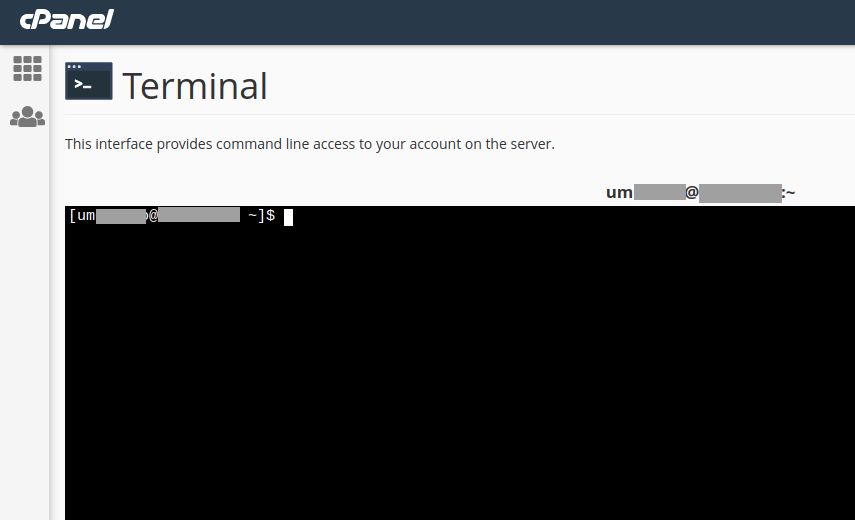
If a terminal like shown in the below screenshot opens, you have got the terminal access to your server. Keep this browser tab open. We will need it in the upcoming steps.
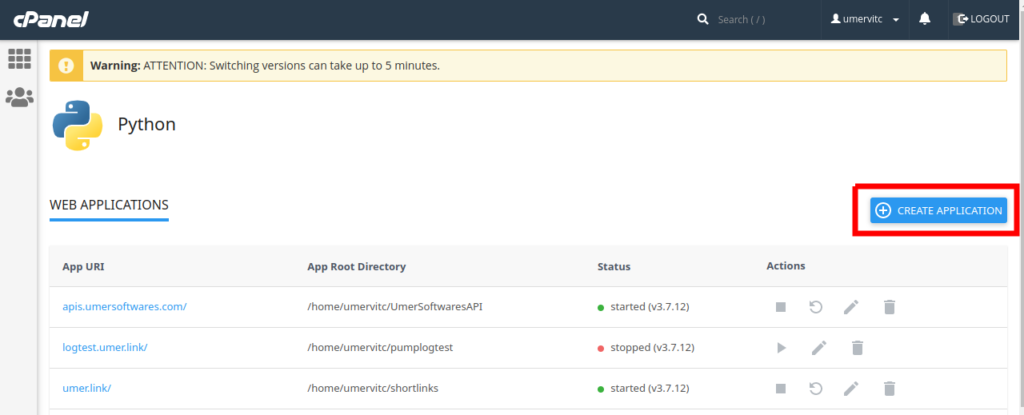
Setup a new Python app
In your CPanel, open Setup Python App

Click on the Create Application button.
- Set the Python Version to 3.9.12
- The Application Root is the folder in your hosting where the python application will be created. This will be the folder where you will start or upload your Django project.
- In the Application URL, select the domain/subdomain and sub-directory where you want your Django application to be live. This will be the web address where you will see your Django app.
- In the Application startup file, type
passenger_wsgi.py- In the Application entry point, type
applicationYou can also see the settings in the screenshot below. After you are done, click on Create.
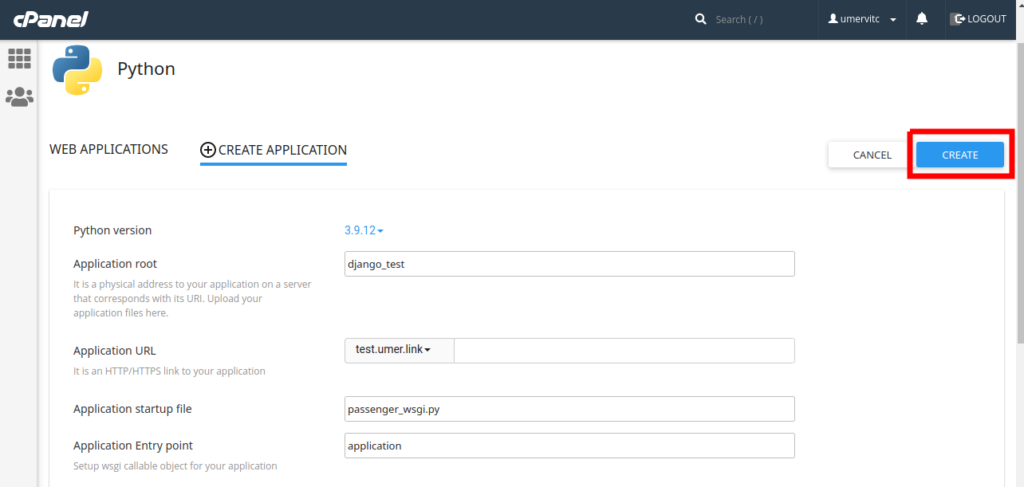
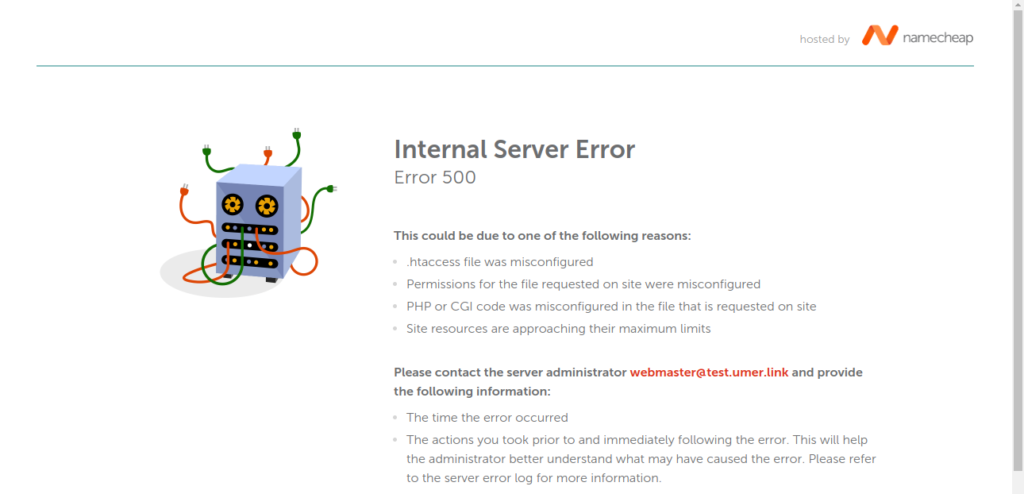
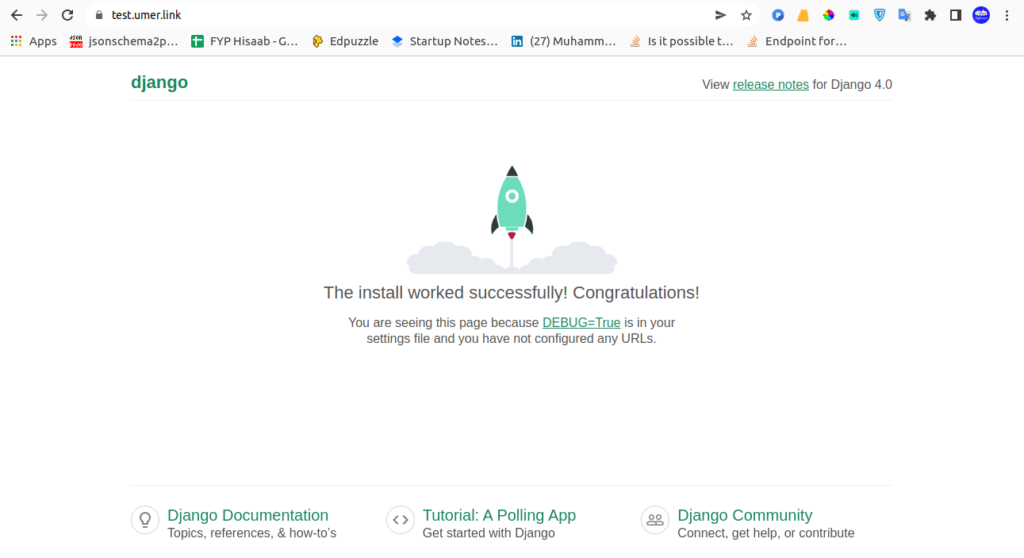
Open the URL where you set up your python app. You should see a page like this. Do not worry about the error yet. It will disappear once we create our Django app.
Install Django
After your python app is set up, you will see a page as shown in the screenshot below. Click the command to enter the virtual environment to copy it to the clipboard.
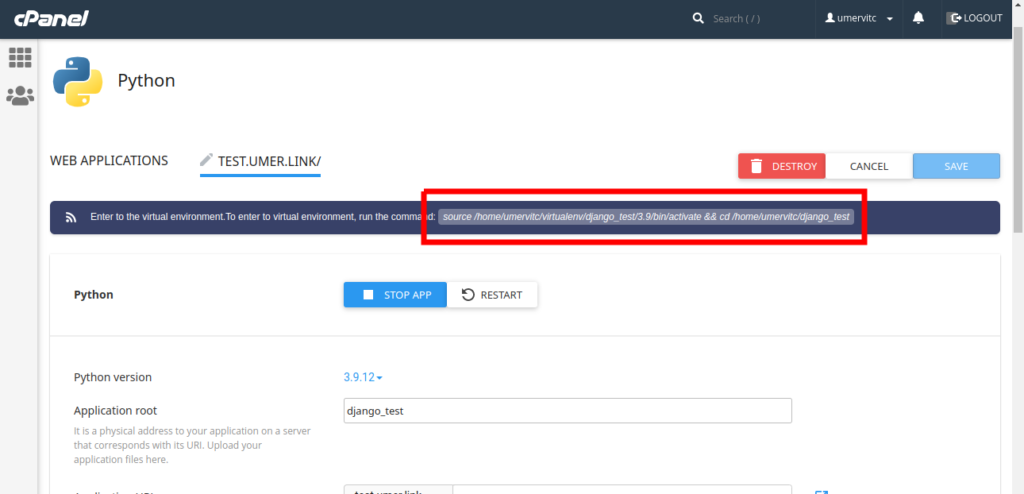
Enter the command into the online terminal by Right Click / Paste and press enter. You will enter the python virtual environment. In my case, the command is
source /home/umervitc/virtualenv/django_test/3.9/bin/activate && cd /home/umervitc/django_testIt will not be the same for you. If there is no “&&cd …” part in your command, you will manually have to cd to the directory where you have set up your application.
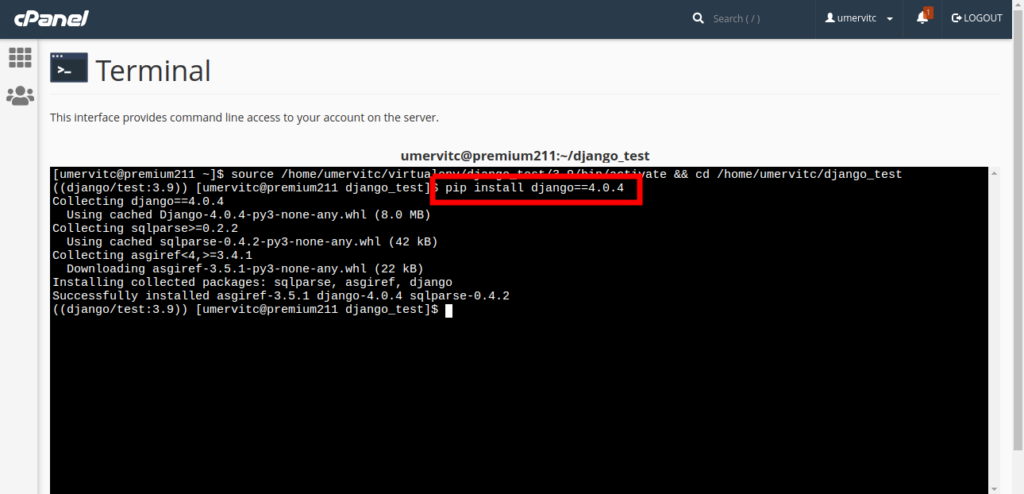
Now you have to install Django. I have tested Django 4.0.4 on shared hosting and it works fine with the deployment method I am describing in this post. You can install Django 4.0.4 using the following command:
pip install django==4.0.4If any other modules are required for your project, install them here using pip.
Confirm the Django installation by running the following command.
django-admin --version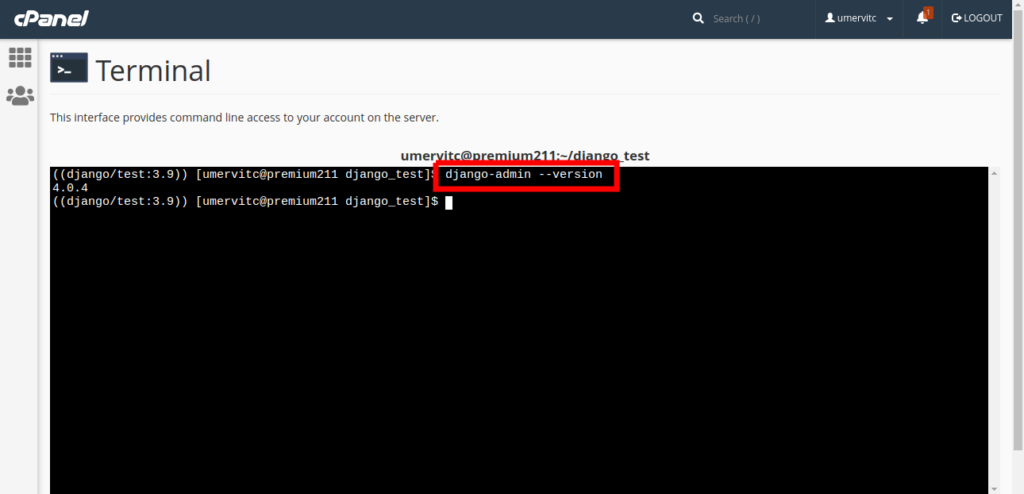
Start a Django project
Create a new project
Go to the terminal in your Cpanel and enter the following command
django-admin startproject myapp ~/django_testMake sure to replace “myapp” with your application name and “django_test” at the end with the directory name where you set up your python app. The directory name should be the same as the one used while setting up the python app.
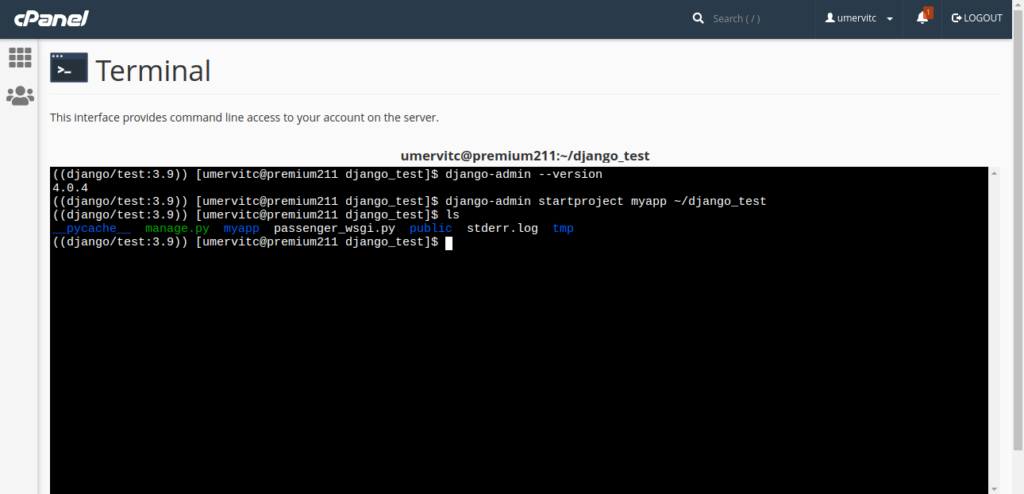
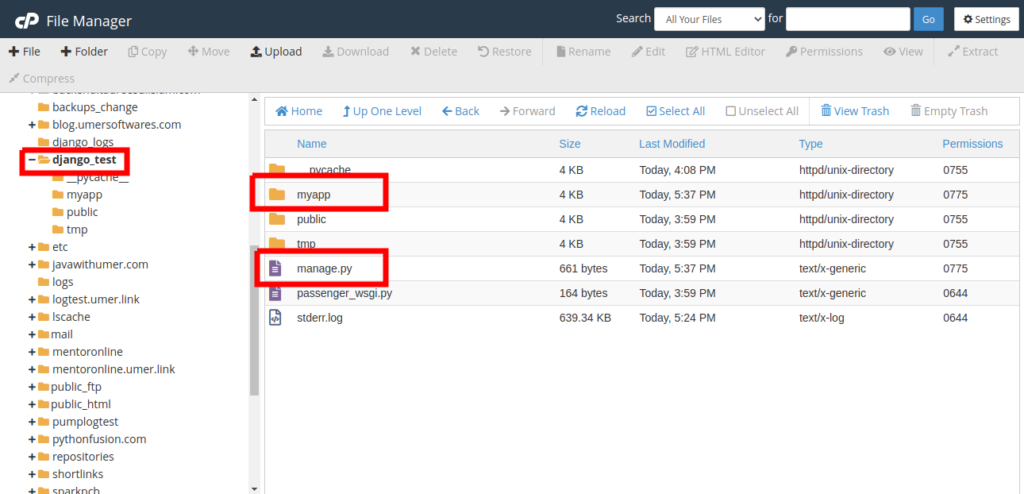
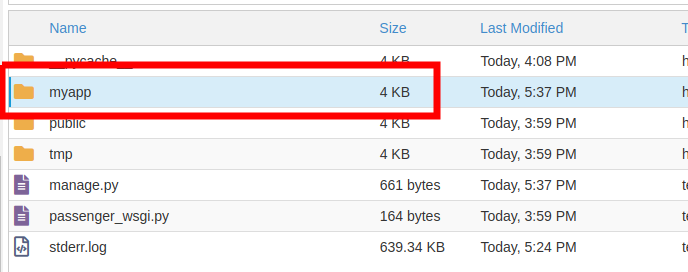
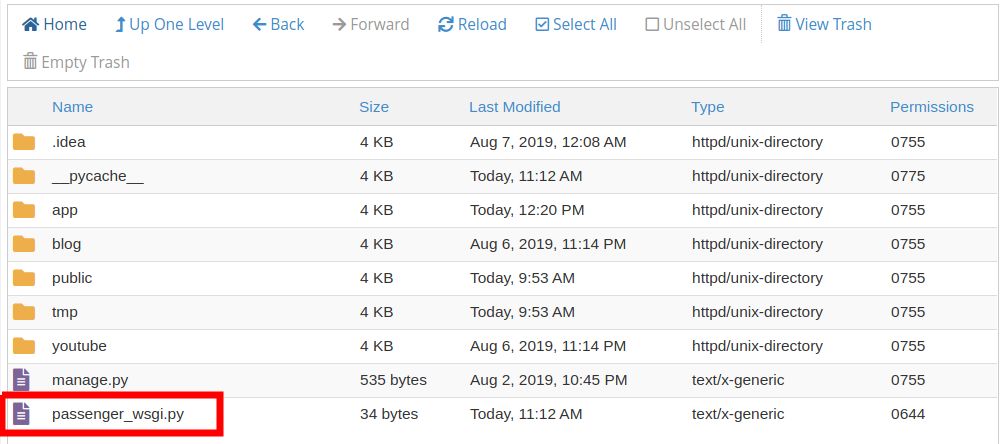
Now open the file manager in CPanel (You can also use FTP) and go the folder where you set up your Django app. In my case, it is the “django_test” folder. You will see a folder with your app’s name and the manage.py file here.
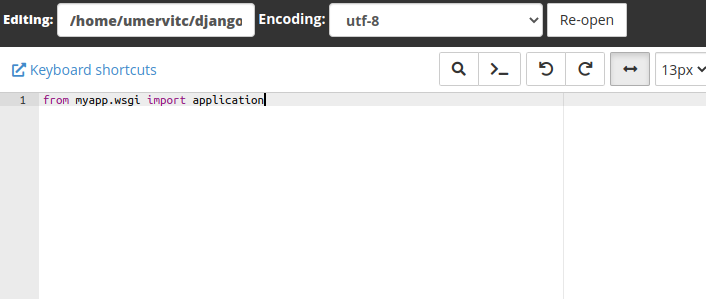
Edit the passenger_wsgi.py file.
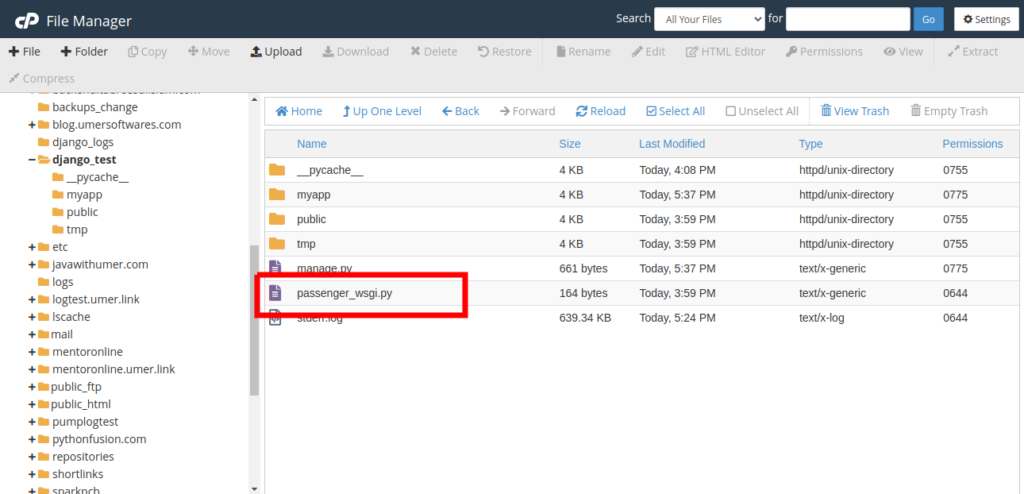
Delete everything in the file and add just one line.
from myapp.wsgi import applicationDo not forget to replace “myapp” with your application name. Click on Save Changes to save the changes to the file.
Now open your application folder_ in my case, it is “myapp”.
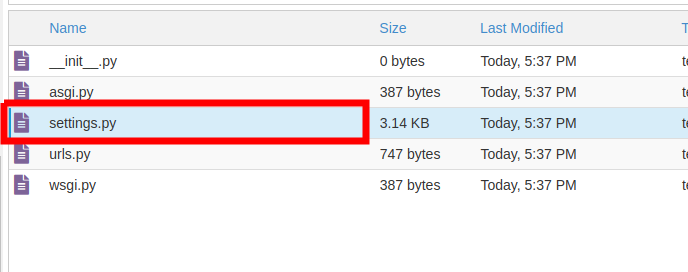
Edit the settings.py file.
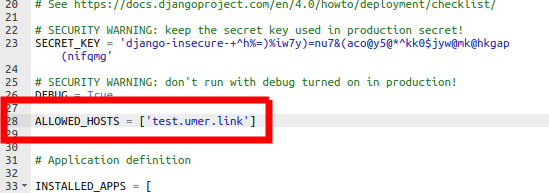
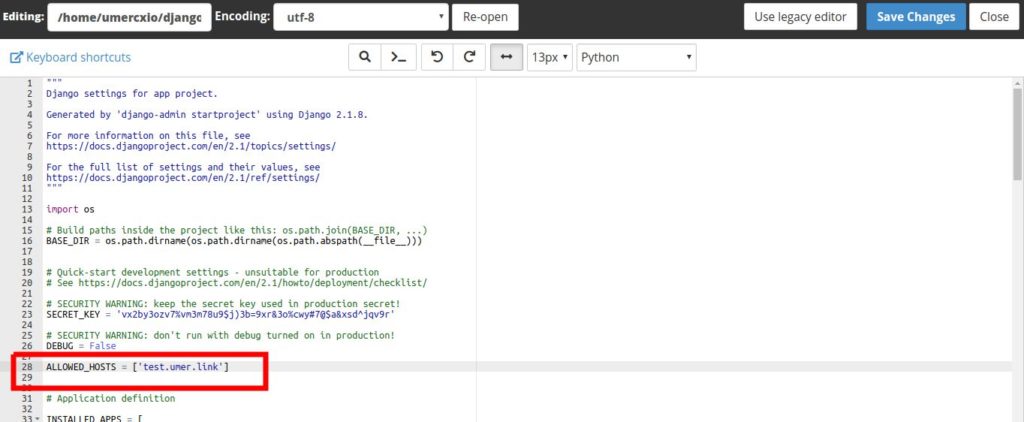
In the ALLOWED_HOSTS list, add the URL where our application will be running (which you provided while setting up the python app). In my case, it is “test.umer.link”. If your site has a www variant, make sure to add that here too if you want your site to be working in www as well.
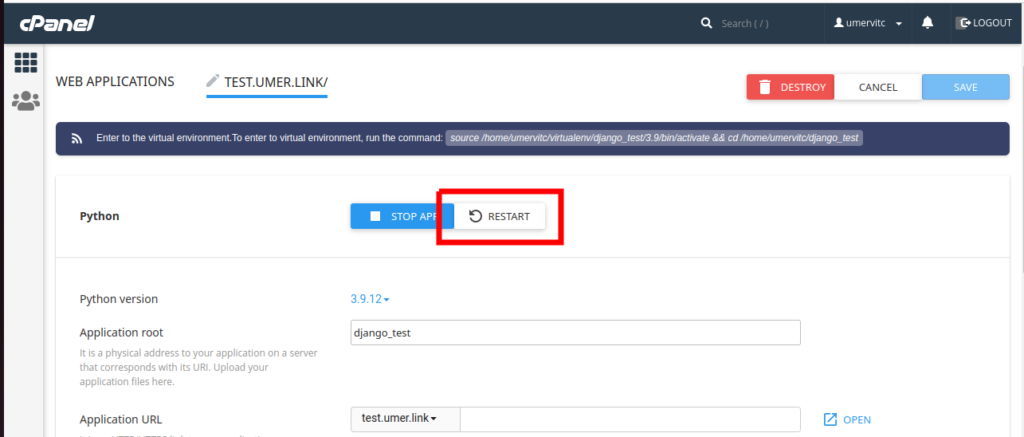
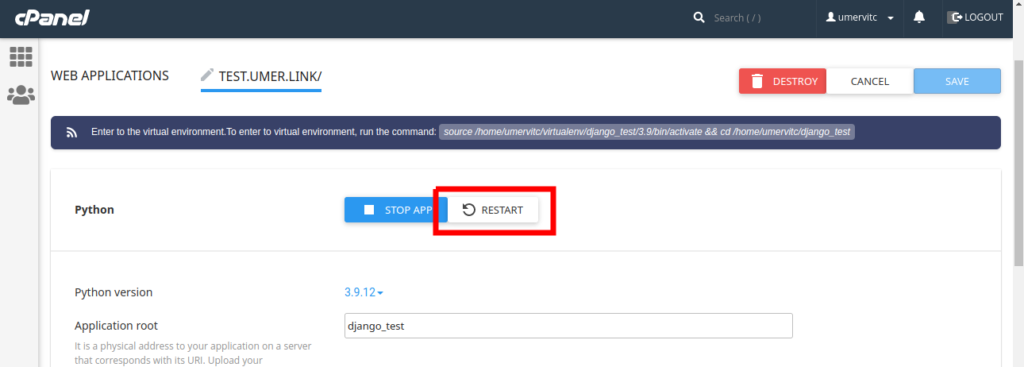
Now go to Set up Python app in your CPanel and Restart your application.
Now open the URL where you have set up your application and you should see the Django welcome page.
Upload an existing project
Upload your project into the folder where you have set up the python app.
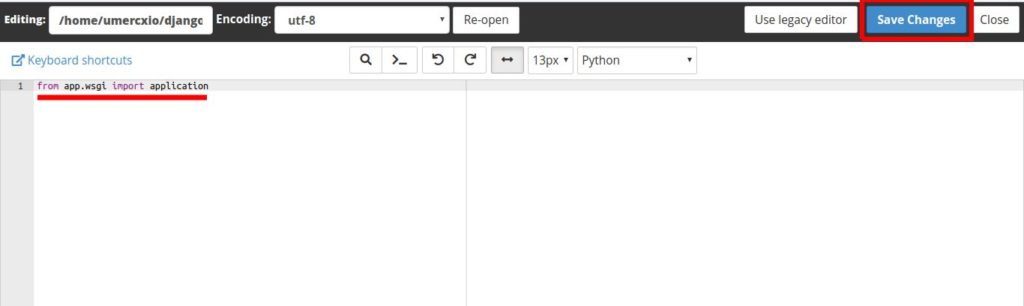
Edit the passenger_wsgi.py file
Delete everything and add the following code:
from app.wsgi import applicationMake sure to replace “app” with your own Django project name. It is the name of the folder that contains the settings.py file.
Edit your project’s settings.py file and add your application URL to the ALLOWED_HOSTS list. If your domain also has a www variant, make sure to add that too to the list.
Set up the database
In this part, we will set up a MySQL database from the hosting with Django. It is also possible to use PostgreSQL database. I have a complete tutorial on that here. For now, let’s continue with the MySQL database because it is commonly available in most of the shared hosting packages.
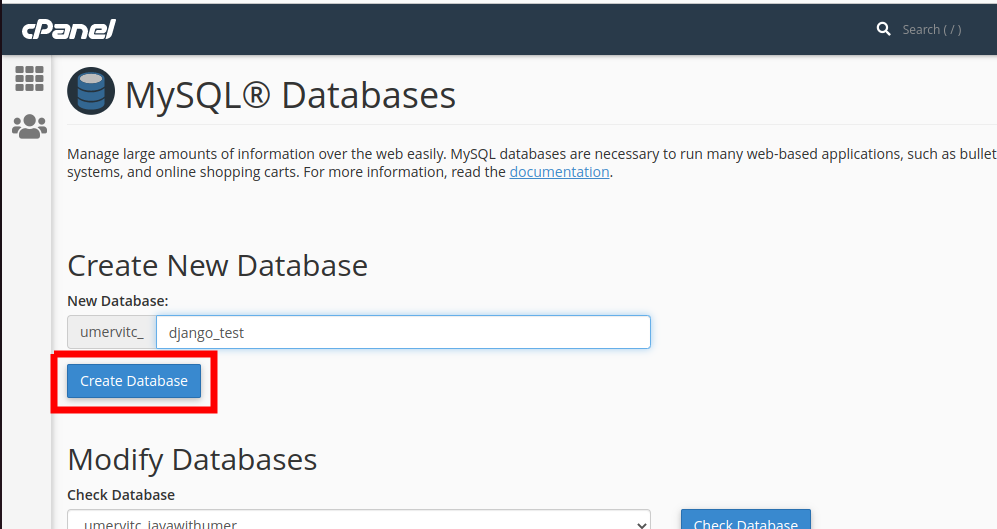
Go to the MySQL Databases option in CPanel.

Create a new Database
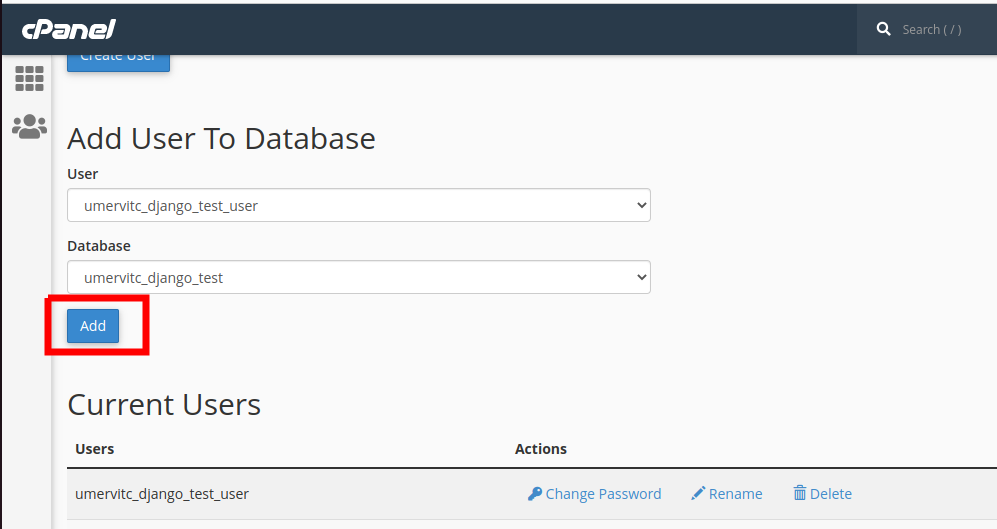
Create a new User. Copy the password of this user somewhere because we will need it in the upcoming steps.

Add the user to the database
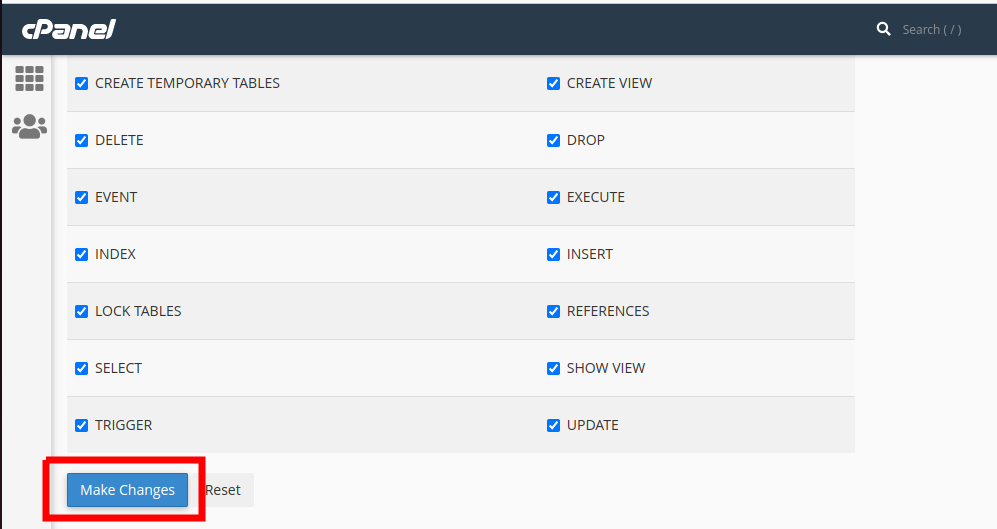
Allow all the privileges to this user.
Go to the terminal again. Enter the virtual environment and run the following command to install mysql with pip.
pip install pymysql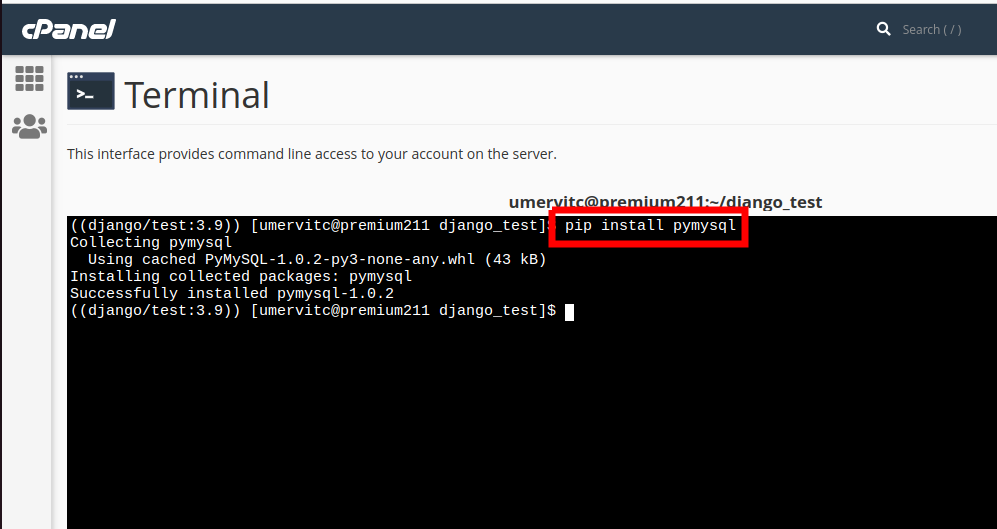
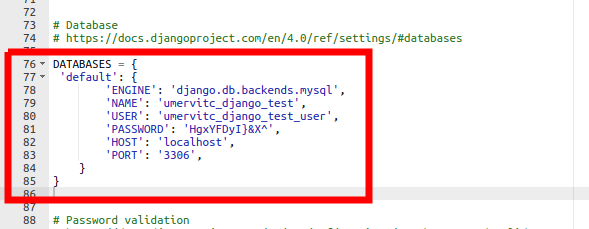
Edit your settings.py file. Replace the default database code with this.
 'default': {
        'ENGINE': 'django.db.backends.mysql',
        'NAME': 'databasename',
        'USER': 'databaseusername',
        'PASSWORD': 'databasepassword',
        'HOST': 'localhost',
        'PORT': '3306',
    }
Make sure to replace the databasename with the database name, databaseusername with the user name and databasepassword with the password for the user.
Now edit the __init__.py file in the app directory.
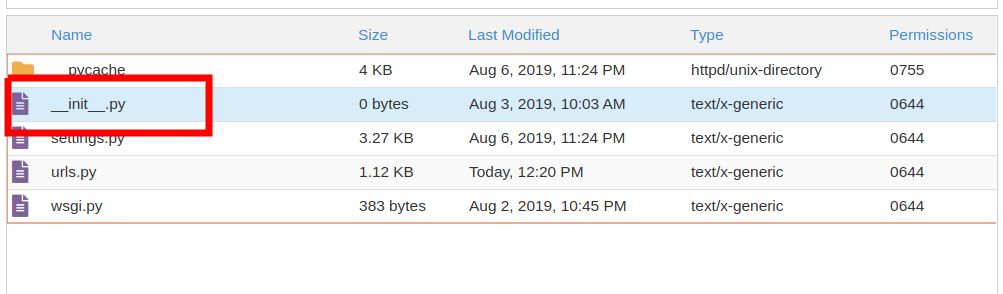
Add the following code to the file and save it.
import pymysql

pymysql.install_as_MySQLdb()
Apply migrations to the database.
python manage.py makemigrations
python manage.py migrate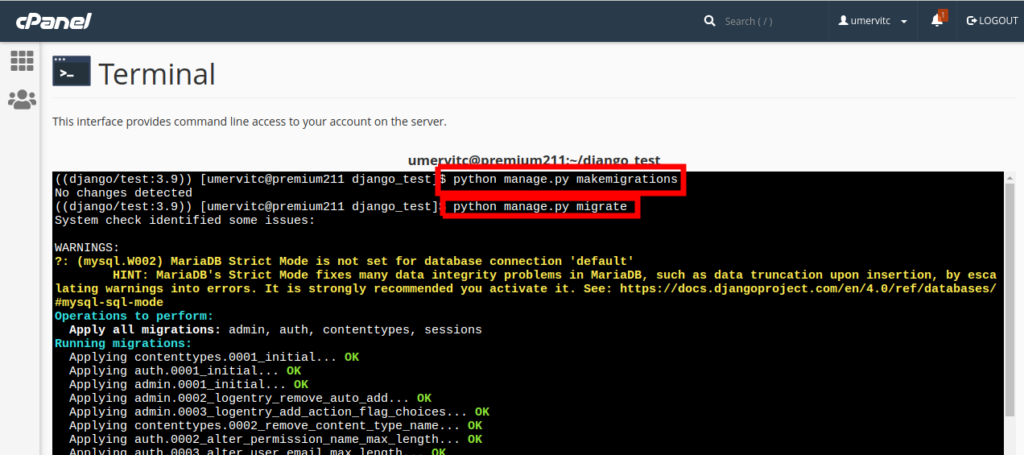
Create a superuser now if you want to access the admin panel. This step is optional.
python manage.py createsuperuser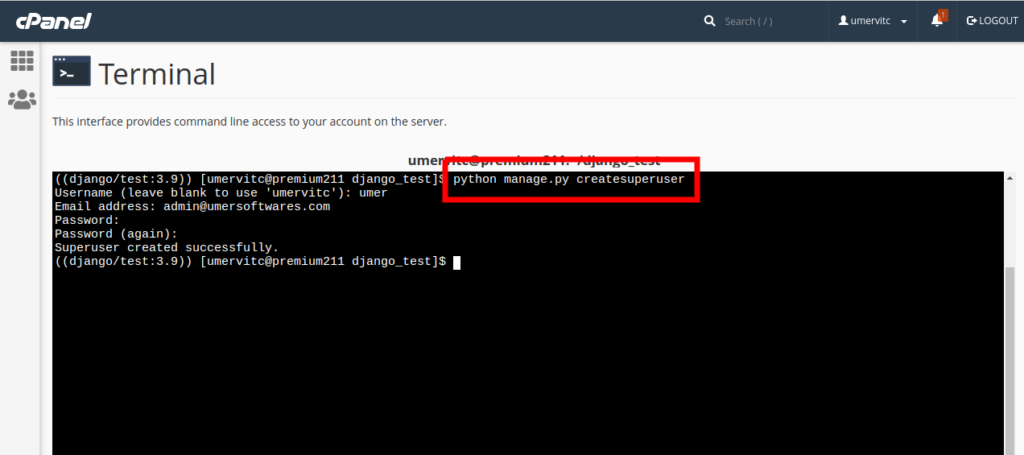
Set up static files
Edit your settings.py file and add the following two lines in the static files section. Make sure to replace username by your CPanel username and the domainroot with the path of the directory which is ser as the domain root.
STATIC_URL = '/static/'
STATIC_ROOT = '/home/username/domainroot/static'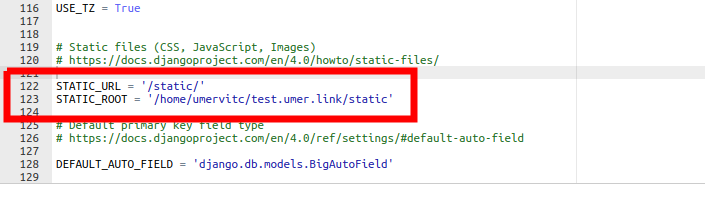
Now open the terminal and run the following command.
python manage.py collectstatic
Go to the domain root folder and check if the static folder has been successfully copied.
Go to “Setup Python App” in CPanel and Restart the app.
If your project is using media files as well, I have written a complete guide about media files and static files in Django on shared hosting which you can see here. (The link is also available at the end of the post)
Test the app
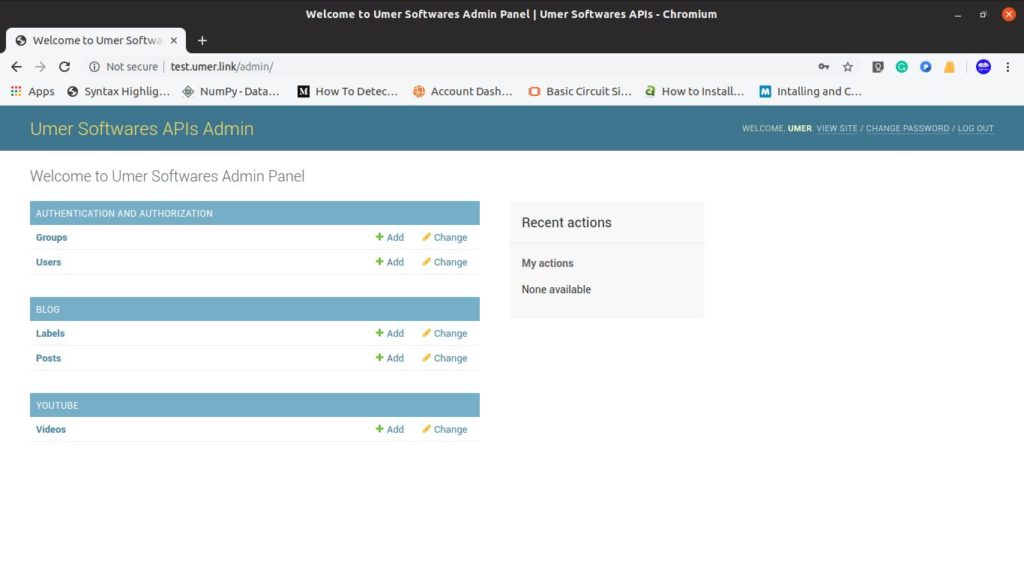
Now go to http://yourappurl/admin and log in using the superuser details you created previously.
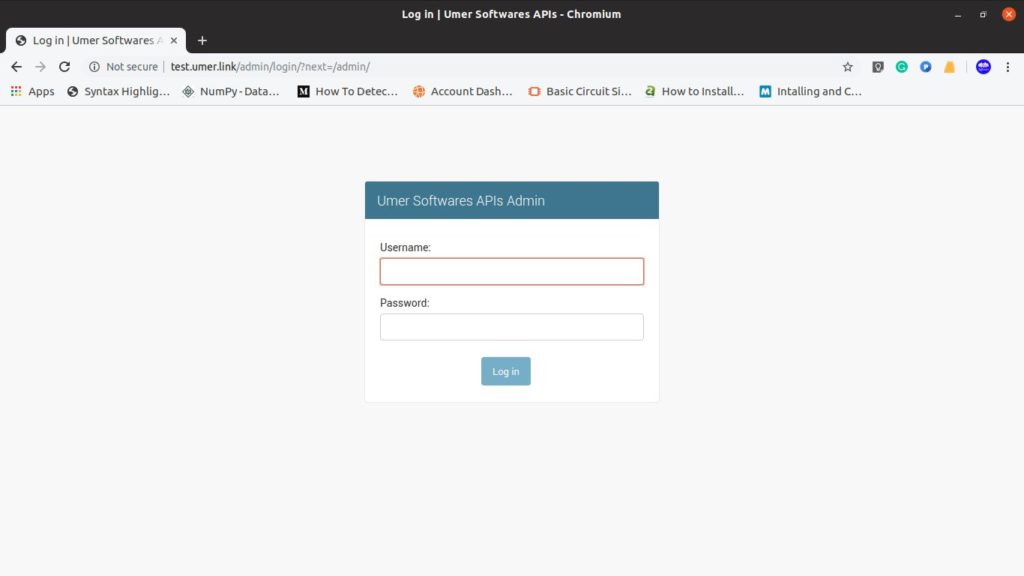
If you see the admin panel, congratulations! your Django app has been deployed on your shared hosting.
Deploy in 5 minutes
After you have followed this tutorial successfully and practiced deploying an existing application twice, you can deploy the Django app to your shared hosting in under 5 minutes using the pdf handbook that I have created. It just highlights the steps that you have to go through in the process of deploying your application.
Frequently Asked Questions
- It keeps on showing the error page and I don’t know what went wrong
- Can I use git to get my files?
- My hosting does not support python
- In the wsgi file, I have to use the name of the django app or the django project?
- I have made some changes in the files and they are not updated on the website
- Saving an ImageField gives a 404 page
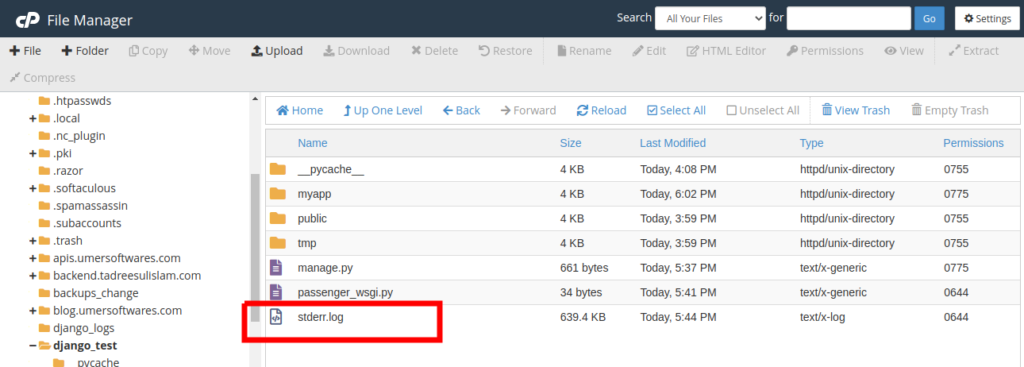
It keeps on showing the error page and I don’t know what went wrong
In your CPanel’s file manager, go to the project folder and see the error logs in the “stderr.log” file.
Can I use git to get my files?
Yes. You can use git to get your files. Open the terminal in CPanel (or get command-line access via ssh). Navigate to the folder where you want to set up your django app and use git to get the files in that directory.
My hosting does not support python
Get a shared hosting that supports python. I use and recommend Namecheap shared hosting.
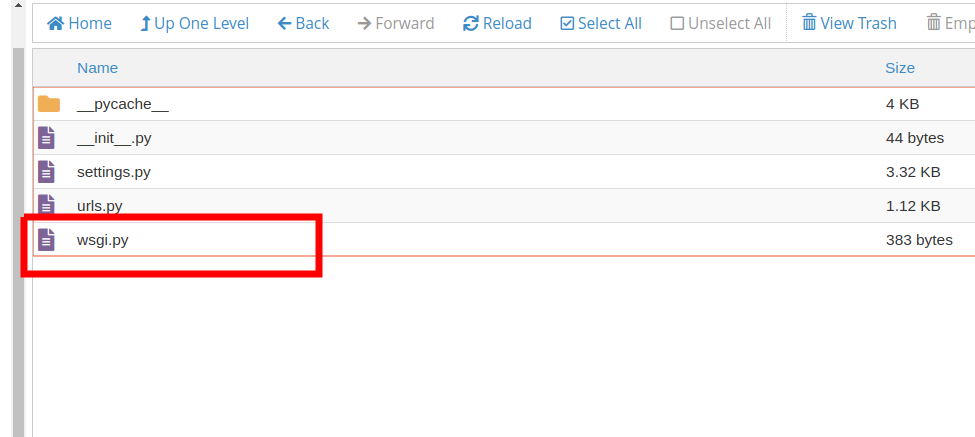
In the wsgi file, I have to use the name of the django app or the django project?
You have to use the name of the project. The contents of the passenger_wsgi.py will be:
from projectname.wsgi import applicationYou can actually find the wsgi.py file inside the project folder. It is in the same folder as your settings.py.
I have made some changes in the files and they are not updated on the website
You need to restart the python app every time you make some changes in the files. There are a few points to note:
- If you have made changes in models.py, restart the python app and do migrations.
- If you have added any static files, restart the python app and then do collectstatic.
- For any other file, just simply restart the python app.
Saving an ImageField gives a 404 page
See this stack overflow for the solution to this problem https://stackoverflow.com/questions/63328969/cannot-upload-media-files-on-cpanel-using-django
I hope this post was helpful. If you have any problem, feel free to ask in the comments. I will update the answers in the FAQ section.
Useful Links
- Setting up media files and static files in Django on shared hosting.
- Use PostgreSQL database with Django on shared hosting
- Buy Django compatible shared hosting.
- Buy a domain along with hosting and enjoy from 50% to 100% discount on the domain along with a 50% discount on hosting

Comments
Thank you! This was really very helpful. I just wish I would have seen it a few days ago. It would have saved several fruitless support communications and my meandering discoveries. All the information I have needed so far is here for implementing a django app on a shared host.
Can u also decribe steps for media files as well.
Author
Please contact me using the contact page of the website to discuss the problem you are facing with the media files so that we can solve the problem and I will update the post accordingly.
pip is configured with locations that require TLS/SSL, however the ssl module in Python is not available.
Collecting django==2.1
Cache entry deserialization failed, entry ignored
Could not fetch URL https://pypi.python.org/simple/django/: There was a problem confirming the ssl certificate: Can’t connect to HTTPS URL because the SSL module is not available. – skipping
Could not find a version that satisfies the requirement django==2.1 (from versions: )
No matching distribution found for django==2.1
getting this error
Author
This problem never existed before but it is occurring now. The solution is to use python 3.6 instead of 3.7. I have also updated this in the post.
Author
I contacted the NameCheap support about the problem and it is fixed now on their servers. Python 3.7 will work fine now.
Can I use git to get my files?
Author
Yes you can do it on most of the hostings.
thanks it will be great for me , i want 2 things from you
1- first , what is the best hosting (shared) for django having unlimited storage
2- how i can setup template and media folders please
Author
I am using the Stellar Plus Plan from NameCheap shared hosting. It has unlimited storage with a file limit of 300,000 files. For media files, I will soon be writing a post about it on pythonfusion.com
Thanks, great post here.
However assuming i want to use Github to automatically deploy my app each time i commit master?
Author
I don’t think that’s possible here. Every time any change is made to the code files, you need to restart the python app in CPanel. That is too be done manually.
Great guide, ton of practical info!
For a Django based web app that i am currently building, I am planning to host it in shared host like namecheap. I noticed in some blogs and QAs, shared hosting is not ideal for Django, due to issues like stability and unavailability of some pip modules. Have you experienced these issues? Based on your experience, do you recommend a shared host for hosting a small commercial Django web app? Traffic and CPU time is not a concern for my web app since it will be used by small set of users, but availability of the app would be highly required. Can you share your experience on hosting Django website on a shared host?
Author
There are better options than shared hosting for a django app. But it works fine for normal apps. I am using it and it works fine for me. Yes there are some modules that do not work but I wasn’t using them anyway.
You can message me with the modules that you are using. I will test them for you.
I am getting Internal server error when i try to access admin panel. (https://my-site-name.com/admin)
Author
Set up the logs file in the python app. Then again open the url which causes the internal server error. This time, the error will be logged to the file. Open the file and see the error. Also make debug = False in settings in django so that you can see if there is some error with django.
you can write scripts for that
Author
For what?
Thanks for your effort, after following the steps I get this error message NotSupportedError at / URI is not supported
Author
Is your Django app working correctly on the localhost?
This is nice. I followed it carefully and was able to host my site on namecheap. However, I was unable to save ImageFiled or FileField in the MySQL database from the admin panel. Please I need help
Author
See this stackoverflow for solution https://stackoverflow.com/questions/63328969/cannot-upload-media-files-on-cpanel-using-django
My python app installed correctly but when open the link its reloaded and show takes too much time for response how to fixed it ..i m using shared hosting with litespeed server ….Thank you
django.db.utils.OperationalError: (1130, “::1′ is not allowed to connect to this MySQL server”)
above error being face when I make migrations in terminal pls guide
Author
Share your settings for the database in settings.py
DATABASES = {
‘default’: {
‘ENGINE’:’django.db.backends.mysql’,
‘NAME’:’khur_shop’,
‘USER’:’khur_ammad’,
‘PASSWORD’:’ammad@22334′,
‘HOST’: ‘localhost’,
‘PORT’: ‘3306’,
}
}
Author
Have you granted all the privileges to this user for that database?
yes
bro i did all steps but is show this error in passenger_wsgi.py file
File “/home/techmjiu/techpediaa/passenger_wsgi.py”, line 1, in
from blog_app.wsgi import application
ModuleNotFoundError:
No module named ‘blog_app.wsgi’
how to fix it
Author
Instead of blog_app, specify the name of the folder that contains your settings.py. You will find the wsgi.py file in the same folder and this is the file that we are importing in the python code here.
yes thanks i fix it and website now is running but i have new problem when i add new recored from admin panel look to my question please ,
https://stackoverflow.com/questions/64911134/error-while-add-new-record-the-current-path-blog-app-android-add-didnt-match
Author
I have posted an answer. See it here https://stackoverflow.com/a/64911421/8868448. The solution was originally presented by some other stackoverflow user which can be seen here https://stackoverflow.com/a/63535409/8868448
thankss a lot bro it’s work now , you are smart thanks
Author
You are welcome. I am glad it helped.
thanks bro ,, can you help me with this please
https://stackoverflow.com/questions/64929201/use-email-created-on-cpanel-django
Author
Don’t post every small problem on stackoverflow. You will end up getting downvotes or even your question closed. Stackoverflow is for questions that are general (so that others can get help from it as well) and require that the user must have done complete research on the issue before posting the question.
The solution to your current problem is to send emails using smtplib and MIMEMultipart. These libraries are general for python, not specifically for django but they work in django as well. If you search about sending emails using python, you will find tutorials on smtplib and MIMEMultipart.
Is there a way to allow access to a sub-directory AFTER I have installed and configured django app? I wish not to mess with the existing django deployment. I want now to test out Prestashop on my sharedhosting account, but I already configured it to run a django app. I can not access the prestashop folder.
Is there a work-around you can suggest?
Author
Create a folder in your domain’s root folder with permissions 0755 and you will be able to access it as a subdirectory in your domain. ALternatively, you can create a subdomain in cpanel and install the other app in it.
terminal is not available in my hosting. now what i do for installation of django
how to access window terminal using SSH keys?
Thank you for the article. But I have a headache trying to understand why in the world CAN’T you use the newest version of Django on shared hosting with MySQL. Django officially supports MySQL. So what causes this issue on shared hosting? The very first thing I would have done when they said I had to use version 2.1 of Django is ask why this is. There has to be a reason.
If you can use the newest Django with MySQL on a VPS, what’s stopping it from connecting to MySQL on shared hosting?
Thanks